| Main Page - Back |
|
From SudokuWiki.org, the puzzle solver's site |

Multivalue X-Wing Strategy
As of March 2010 this strategy has been deprecated. Although useful too look out for in pen and paper solving it is a strict subset of several chaining strategies and therefore has been removed from the solver. The documentation will remain on this site
I've named this strategy Multivalue because we're dealing with several candidate values but the formation is exactly as an X-Wing, infact it also follows the generalised x-wing as described above.
I've named this strategy Multivalue because we're dealing with several candidate values but the formation is exactly as an X-Wing, infact it also follows the generalised x-wing as described above.
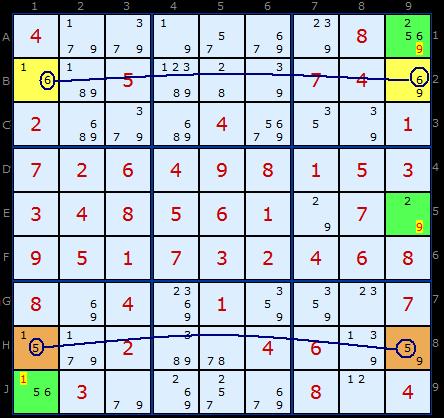
The logic goes as follows: 6 must occur in one of the two yellow cells and the 5 must occur in one of the brown cells. No doubt about that. But both 6 and 5 cannot occur in the same column. Lets pretend they do, say 6 and 5 in column 1. That would leave 9 as the only solution in two cells in column 9. Can't have that. So which ever way round 6 is 5 will be in the opposite column.
This forces the 1 and 9 to fill the remaining two corners. If 1 and 9 are guaranteed to be in either a yellow or a brown cell apiece then we can't have any more 1s and 9s in those columns. Hence the eliminations.
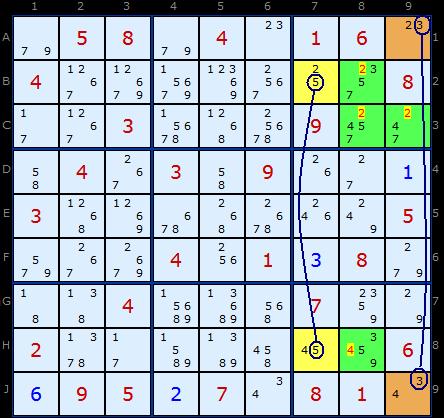
Using the arguement above we know that one 5 or 3 will occur in B7 or A9 forcing the other cell in the top right box to be a 2. We don't know which yet, but of those two cells will be a 2 so all the others in the box can go.
Likewise, a 5 or a 3 will appear one of the cells int the bottom box, H7 or A9. That forces 4 to be the solution to that pair - we just don't know which way round yet. The 4 in H8 can go.
Eliminations such as these can be achieved using Nice Loops and other very advanced strategies but this is well worth looking out for separetely since its both easier to spot and extends the elegance of the familiar X-Wing.