| Main Page - Back |
|
From SudokuWiki.org, the puzzle solver's site |

X-Wing Strategy
This strategy is looking at single numbers in rows and columns. It should be easier to spot in a game as we can concentrate on just one number at a time.

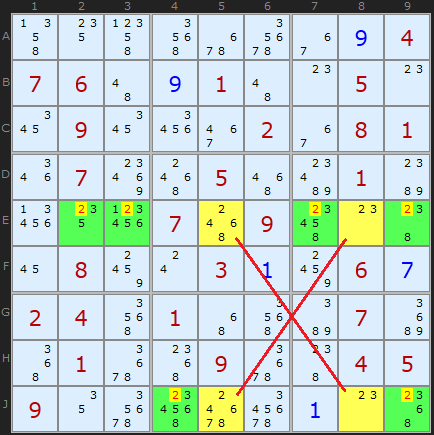
Well, A and B are a locked pair of 7s. So are C and D. They are locked because they are the only 7's in rows B and F. We know therefore that if A turns out to be a 7 then B cannot be a 7, and vice versa. Likewise if C turns out to be a 7 then D cannot be, and vice versa.
What is interesting is the 7s present elsewhere in the fourth and eighth columns. These have been highlighted with green boxes.
Think about the example this way. A, B, C and D form a rectangle. If A turns out to be a 7 then it rules out a 7 at C as well as B. Because A and CD are 'locked' then D must be a 7 if A is. Or vice versa. So a 7 MUST be present at AD or BC. If this is the case then any other 7s along the edge of our rectangle are redundant. We can remove the 7s marked in the green squares.
The rule is
When there are
The reverse is also true for 2 columns with 2 common rows. Since this strategy works in the other direction as well, we will look at an example next.
The rule is
When there are
- only two possible cells for a value in each of two different rows,
- and these candidates lie also in the same columns, then all other candidates for this value in the columns can be eliminated.
The reverse is also true for 2 columns with 2 common rows. Since this strategy works in the other direction as well, we will look at an example next.

A few steps later the second X-Wing is found on candidate 3 in the same rows. Whichever way round the 3 can be placed in those rows (E2/J8 or E8/J2) there can be no other 3 in rows E and J except in those yellow cells.
Generalising X-Wing
X-Wing is not restricted to rows and columns. We can also extend the idea to boxes as well.
If we generalise the rule above we get:
When there are
then all other candidates for that value can be eliminated from the latter two units.
Now we have 6 combinations:
If we generalise the rule above we get:
When there are
- only 2 candidates for a value, in each of 2 different units of the same kind,
- and these candidates lie also on 2 other units of the same kind,
then all other candidates for that value can be eliminated from the latter two units.
Now we have 6 combinations:
|
|
Here is an example of combination 5. Starting from 2 rows and eliminating in 2 boxes, in this case the last two boxes in the Sudoku. The rows are 7 and 8 and they each have two 7s. Our x-Wing is now a trapezoid but the logic is the same. We can be certain that 7 can be eliminated in the red circled cells.

But HOLD UP one moment. There is a simpler strategy that does the same job!
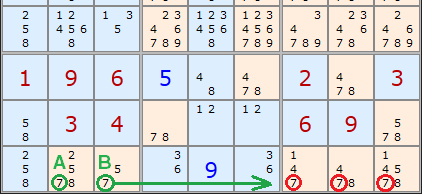
A and B above are a pointing pair. This removes the same 7s in the same place. Combination 6 is also the complement of a pointing pair. Combinations 3 and 4 are also complements of the Line/Box Reduction. Our generalisation of X-Wing to boxes hasn't profited us at all. We learn that
X-Wings containing boxes are the inverse of the Intersection Removal strategies
But HOLD UP one moment. There is a simpler strategy that does the same job!
A and B above are a pointing pair. This removes the same 7s in the same place. Combination 6 is also the complement of a pointing pair. Combinations 3 and 4 are also complements of the Line/Box Reduction. Our generalisation of X-Wing to boxes hasn't profited us at all. We learn that
X-Wing Exemplars
These puzzles require the X-Wing strategy at some point but are otherwise trivial.They make good practice puzzles.
- Exemplar 1, x1 (score 80)
- Exemplar 2, x1 (score 82)
- Exemplar 3, x2 (score 174, +1 Naked Pair)
- Exemplar 4, x2 (score 178, +1 Naked Pair)