| Main Page - Back |
|
From SudokuWiki.org, the puzzle solver's site |

Hidden Unique Rectangles
All the Unique Rectangles discussed on this page have had at least two bi-value cells (or a Naked Pair, if you like). An interesting situation emerges when we have only one bi-value cell and the Unique Rectangle is buried, or 'hidden', under lots of other candidates. The conditions have to be just right, but this formation is surprisingly common.
Update Sept 2025: New examples have been sourced that the solver will find without unchecking other strategies and the solver will now display the Strong Links.
Update Sept 2025: New examples have been sourced that the solver will find without unchecking other strategies and the solver will now display the Strong Links.
The types of Unique Rectangles that we've examined so far simply won't work here. However, all is not lost because something interesting is going on in the corner opposite to F3. 6 in H1 is part of two strong links in the row and column - that is, 6 occurs only twice in row H and column 1. Our 6 in this rectangle can have only one of two possibilities.
Looking at H1, lets make "Option A" the case where H1 is 6. The pairs or "strong links" remove 6 from F1 and H3. Option B is where H1 is not a 6. That would put a 6 in F1 and H3.
Let us conjecture that the solution to H1 is 8. That forces the 6s to take on option B because they would be the only remaining 6s in that row and column (F1 and H3). The implication of this option is that the only candidate for F3 is 8. But, wait a moment - this is exactly the deadly pattern we need to avoid - two numbers in two rows, two columns and two boxes. Since none of these cells is a clue, the puzzle could have two solutions. We can swap the 6 and the 8 around. This makes option B unviable.
So surely we can fix the 6s in F1 and H3? Not quite. We haven't taken into account the clutter of other clues in the corners of this rectangle. But we can say something about the 8 in H1. We've excluded it for the reason above, but option A also excludes the 8 in H1. Whichever way round F1 is, H1 cannot contain a 8, so we can remove it from that cell.
So surely we can fix the 6s in F1 and H3? Not quite. We haven't taken into account the clutter of other clues in the corners of this rectangle. But we can say something about the 8 in H1. We've excluded it for the reason above, but option A also excludes the 8 in H1. Whichever way round F1 is, H1 cannot contain a 8, so we can remove it from that cell.
Type 2 Hidden Unique Rectangles

In Figure 2, the cells C2, C3, J2 and J3 (also known as CJ23) form a rectangle with a potential deadly pattern on [1/8]. In type 2 we have an identifiable Floor consisting of C23 — both bi-value cells. And the Roof contains a clutter of other candidates. We still want to avoid reducing this rectangle to 1/8 in all four cells.
Type 2 starts with a Naked Pair, 1/8, and we're checking for which strong links exist on the pair candidates. The Naked Pair is obviously a double strong link on both numbers, but candidate 1 has a strong link to the Roof in column 2. From this we can start using the logic of Type 1.
Is 8 viable for either Roof Cells? J2 is viable since J3 does not have to be 1. However, J3 as 8 is trouble because it forces C3 to be 1, C2 to be 8 and because of the strong link, J2 becomes 1. A Deadly Pattern. So it is safe to remove 8 from J3. At first glance the formation looks symmetrical but its the other 1s and 8s (or lack of) in the columns that give us the implications of the Hidden Rectangle.
Up to 2024 I was a little too restrictive with the pattern - particularly if there are two strong links operaing on two candidates at the same time allowing two eliminations. Thanks to David Hollenberg for this example.
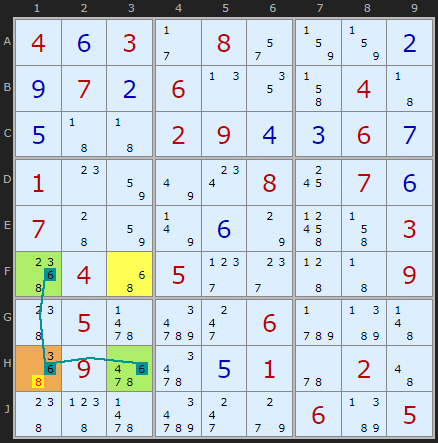
Hidden Unique Rectangle
Type 2: removing 4 at G8 because of GJ58 and one strong link on 1 between J5 and J8
Type 2: removing 1 at J8 because of GJ58 and one strong link on 4 between G5 and G8
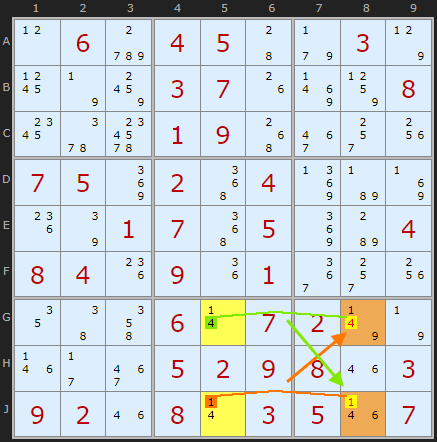
Type 2b Hidden Unique Rectangles
The yellow cells are the floor with conjugate pairs 1/7. The Deadly Rectangle extends to E3 and H3 (orange) where 1 and 7 are also present among other candidates. The strong link on 1 between E2 and E3 means that a 7 in H3 would create a Deadly Rectangle.
Thanks to Jerry Foil of Virginia, USA for providing the first example. Interestingly this type of Hidden Unique Rectangle is almost twice as common as the Type 1 and three times as common as Type 2.

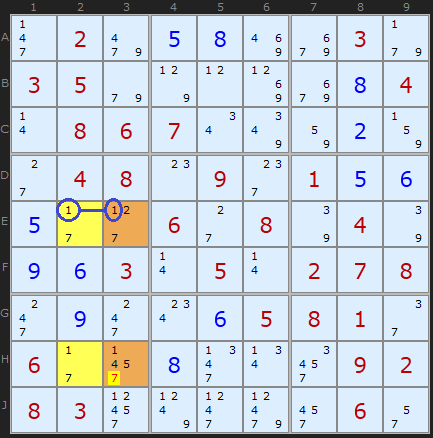
Klaus Brenner in Germany has created some very beautiful Sudokus like the one on the right. It solves trivially up to the point where a Type 1, Type 2 and Type 2b are used consecutively. In the screen shot the Type 2B is shown with the floor in row H.
HIDDEN UNIQUE RECTANGLE Type 2b: removing 7 at J7 because of HJ47 and one strong link between H4 and J4 on 5
Note: Uncheck XY-Chains to find these HURs