
SudokuWiki.org
Strategies for Popular Number Puzzles
Empty Rectangles
As of October 2023 Empty Rectangles has been retired in favour of the simpler pattern Rectangle Elimination
Empty Rectangles can be re-expressed as Grouped X-Cycles. Examples are given below. In order to see the Empty Rectangle the tick-box on the solver for Rectangle Elimination must be off. Counter-examples would be appreciated if discovered.
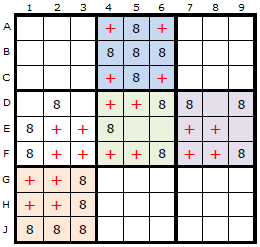
In the first diagram is a spread of candidate 8 around the board but each box must be considered separately when imagining the rectangle, so I have coloured the boxes differently. To be able to apply this strategy we must have at least two candidates left in the box and four or more empty cells.
The red crosses represent the Empty Rectangles. Each of these theoretical rectangles is independent of the others.
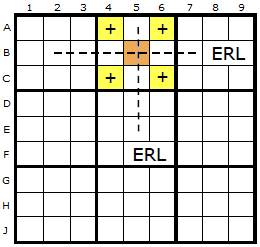
Whatever the formation of the Empty Rectangle (ER), we will have a vertical and horizontal gap where we can imagine two Empty Rectangle Lines (ERLs). These are two lines we can draw inside the box without touching the ER itself.
I have picked box two in this example.
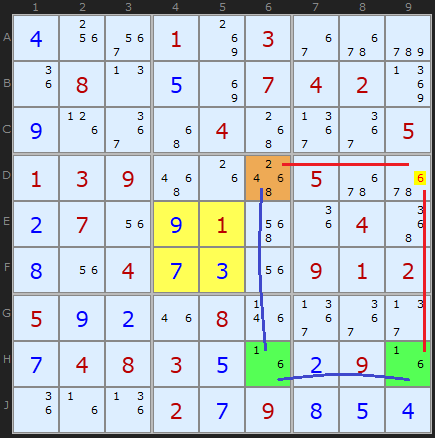
In this diagram the ERIs have been marked with a brown cell.
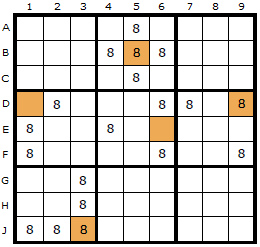
The plus sign now indicates where the Empty Rectangle Intersection (ERI) is placed. In the first example down column 2, two 8s exist and form a strong link (X and Y). One end of the strong link (X at C2) can see the ERI at C8.
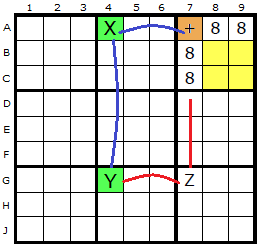
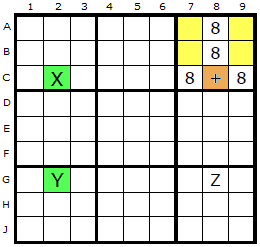
In the second example the ERI at A7 can see an 8 in A4 (the X) and this is paired with the 8 on the cell marked Y. Y can see the 8 in Z which in turn is visible to the original ERI.
It is proposed in both examples that the 8 in Z can be removed.
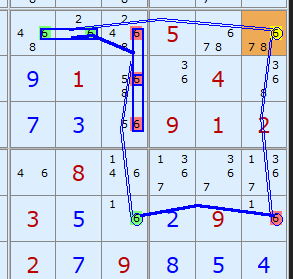
Here is the equivalent Grouped X-Cycle based on candidate 6.
Here is a fascinating double Empty Rectangle. The ERI cell on E3 can see two strong links on candidate 6. There is one in row G between G3 and G9 and in the other in column 8 between E8 and H8. The first one allows us to remove 6 from E9 and the second from H3. Double the fun!
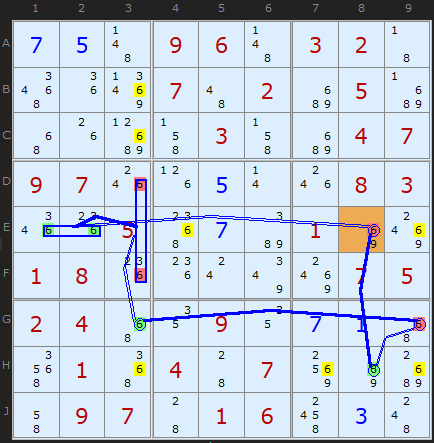
The equivalent Grouped X-Cycle based on candidate 6 gets many more eliminations since it's an off-chain continuous Nice Loop.
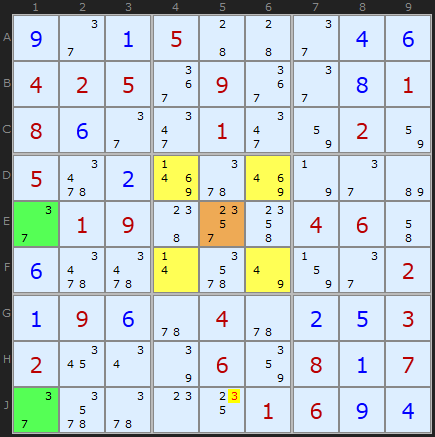
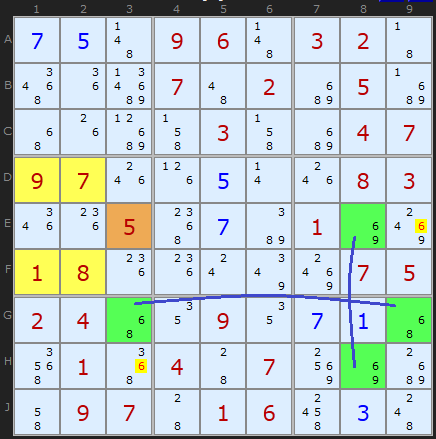
This awesome sudoku has great examples of certain strategies including a symetrical Hidden Quad. At this stage there is a perfectly centered Empty Rectangle based on candidate 3 with no clues in the rectangle cells. I have Klaus Brenner to thank for sending me this puzzle.
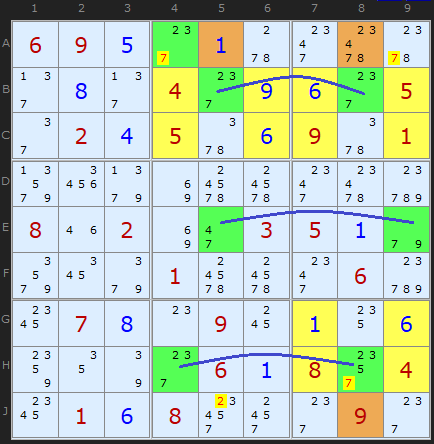
Klaus Brenner has found some very nice looking triple Empty Rectangles. I didn't think we'd find any beyond the double one above, but no, here is one of five he has made.
The solver normally returns just the first instance of an advanced strategy but in the case of Empty Rectangles it will return all instances. Klaus also found a puzzle that returns three different Empty Rectangles in a single step. You can load the puzzle from this link.
Comments
Email addresses are never displayed, but they are required to confirm your comments. When you enter your name and email address, you'll be sent a link to confirm your comment. Line breaks and paragraphs are automatically converted - no need to use <p> or <br> tags.
... by: Pieter, Newtown, Australia
In the first Empty Rectangle Example you say "Here is a real example based on the centre box. ..... The Empty Rectangle Intersection is the orange cell on E6...." I believe you mean the orange (brown?) cell on D6.
Also in your explanations at the top, last 2 grids, you refer to certain cells (i.e. C2, C8, A7, A4) but the grids have no Rol/Col markings. Minor, I agree, but my tired brain noticed. :-)
Thanks,
Pieter
... by: Civiliza
... by: Dazdingoz0r
I have recently started learning the strategies and couldn`t help but notice that here, in the 9th example [ 4th real example ], you made the strong links between 3s and 7s horizontally when in fact, the connections should be vertically, since there is a third 3 on row E at E2 [ so it`s not a strong link even with the elimination of the 3 candidate in E1 ] and two more 7s at J2 and J9 on the J row.
Vertically though, there are only two of each respectively on the 3rd and 7th columns, so that`s how the strong links should be drawn in the example.
I know it`s still possible to see how those two are connected eventually, with the colored boxes and all, but it may prove a bit difficult for someone who is just learning these to see the pattern, since he`ll likely try to make sense of the connections in the example.